Create a Gift/Sundry Type Revenue Center in the Mini POS (Desktop)
The Visual Matrix POS will let you create two types of Revenue Centers: a Retail type for a Gift or Sundry shop and a Restaurant type if
you have a small restaurant. This article will focus on the Gift/Sundry Shop type of Revenue Center.
Path: Point of Sale > Point of Sale > Setup
Setup the Revenue Center
Path: Point of Sale > Setup > Revenue Centers.
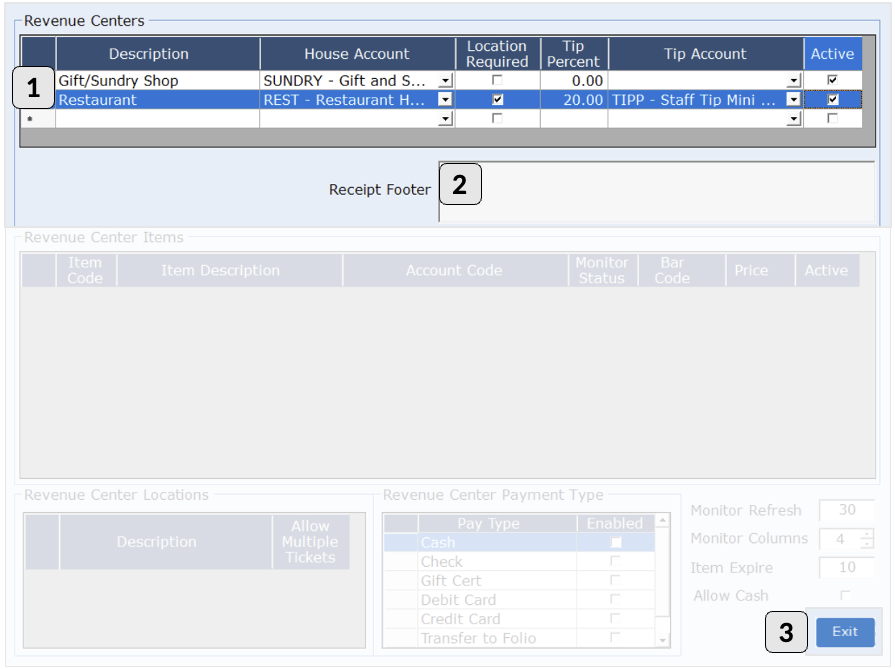
1. Add the revenue center:

Setup the Revenue Center Items

Setup the Payment Type


- enter
a description for the Revenue Center you are creating such as Gift Shop
or Sundry Shop... this example is NOT for a Restaurant.
- choose the designated House Account you created previously in the pre-setup section.
- do not check the box for "Location Required" nor the "Tip Percent" or
the "Tip Account". Those fields will be for a Restaurant Type Revenue
Center.
- check the "Active" box to Activate the Revenue Center.
2. Enter here any message you wish to print on the receipt.
3. Exit and get back in to continue and enter the items.
Setup the Revenue Center Items
Path: Point of Sale > Setup > Click on the Revenue Center > Revenue Center Items.
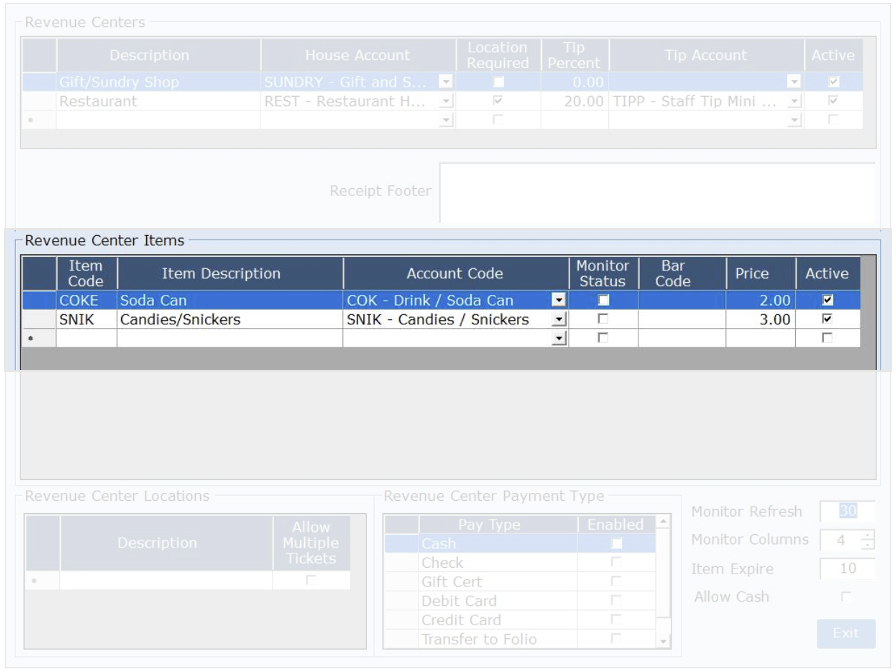
Enter one by one the items you created previously in the Accounting section in the pre-setup section.
Add each article you will sell:
- choose the code of that item. Limited to 4 characters. You can use the same code as the Accounting code.
- enter a description. You can use the same code as the Accounting code.
- choose the corresponding Accounting code for that item.
- do not check the Monitor Status. This field will be for a restaurant-type revenue center item.
- If you have an ID/Bar Code Scanner, you can scan it here. You can also enter the barcode number manually.
- enter the price of the Item, before tax. The tax status has already been added to the Accounting Code setup.
- Check the "Active" box to Activate the Item in the Revenue Center.
Setup the Payment Type
Path: Point of Sale > Setup > Click on the Revenue Center > Revenue Center Payment Type.
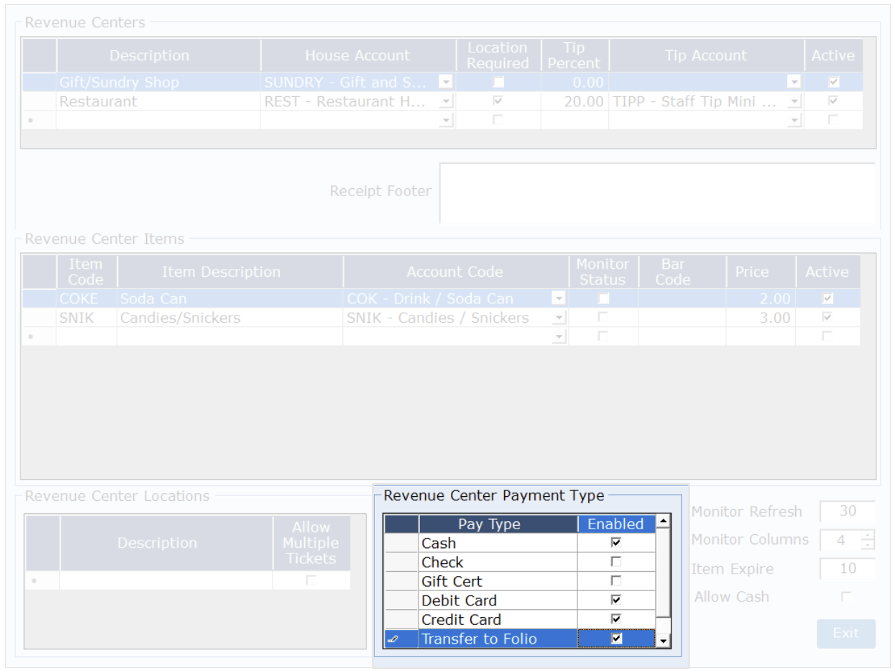
Check all the Methods of Payment you will accept for that Revenue Center. Transfer to Folio will be used to transfer the ticket total to the guest room folio.

The Revenue Center Locations on the left and the Monitor Settings on the right are for a Restaurant Type Revenue Center.
Related Articles
Create a Restaurant Type Revenue Center in the Mini POS (Desktop)
The Visual Matrix POS will let you create two types of Revenue Centers: a Retail type for a Gift or Sundry shop and a Restaurant type if you have a small restaurant. This article will focus on the Restaurant type of Revenue Center. Path: Sale > Point ...Setup the Mini POS (Desktop) 🎥
? Watch Video Before setting up the revenue centers in the Mini POS, you need to create accounts for those centers and for each items that you will sold. The Mini POS pre-setup is made of 2 creation steps: the house account(s) and the accounting ...Mini POS - Kitchen Monitor Screen (Desktop)
Path: Point of Sale > Monitor 1. Click on the Restaurant type Revenue Center to see any open Location (Table). 2. Click on Monitor at the bottom left. The top of the Monitor has the pending orders from each section or table You will see the amount of ...Setup a New Room Type (Desktop) 🎥
? Watch Video Path: Management > Setup > Rooms > Room Type Config 1. Use the last empty line to create the new room type. 2. Enter a Room Type. Length is limited to 6 characters. 3. Enter a Description. Length is limited to 30 characters. 4. Select ...Create a Package (Desktop) 🎥
? Watch Video Packages can be created for guests to purchase in addition to their reservation. A good example is a Romance Package that would include the night with a dinner and a bottle of Champagne in the room. Instead of selling every item ...